Wednesday, 2 November 2016

Fixing a vintage Singer sewing machine motor controller

    With my work writing for Hackaday, this blog has been rather neglected of late. However there are still a few things to write about on a personal basis, and this is one of them.
    I have more than one 1950s and 1960s era Singer sewing machine in my life. These machines are about as good as it gets in terms of straight line sewing, they don't have fancy stitches like a modern machine but they are tough as old boots and will outlast us all.
    Sadly there are a few parts even on a '50s Singer that won't outlast us, in fact they're failing here and now. I'm talking about the suppression capacitor in the motor controller, which after sixty years of service is now in most cases reaching the end of its life and failing. You plug in the machine one day and it starts up all of its own with no foot on the button, there is a horrible burning smell, and smoke comes from the foot controller. You have two choices if you want to keep the machine running, buy a modern electronic controller from a specialist Singer spares supplier, or fix the original. It's the latter course I'll now describe.
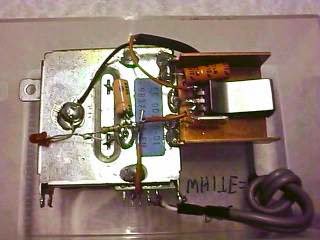
Cover off, dead capacitor with brown gunge.
    In that foot controller is a rheostat, a contactor switch, and a capacitor. The capacitor suppresses sparks on the switch, and when it fails it goes short-circuit. Some people say you don't need the capacitor, but while the machine will run without it the life of the switch is reduced.
    The capacitor is a pretty standard mains suppression capacitor, a 0.1 microfarad item with a 250VAC rating. It's the voltage rating that's the important bit rather than the capacitance, use a lesser rated one and expect fire. Happily these are easy to order and don't cost much, you are looking for one described as "Class Y", or sometimes Y1 or Y2. Mine came from Farnell, but you can buy the same from almost any other electronic supplier. Make sure you pick one with decent lead length though, as you'll see you need those wires.
    If you open up the Singer foot control by undoing the four screws on its bottom and gently prising it apart, you'll see the problem immediately. On top of the ceramic rheostat housing is the silver can of the capacitor, and if it's failed you'll see plenty of brown gunge spilling from one end. Be careful of this gunge, it's probably quite harmless but you don't know quite what chemicals went in to '50s components.
New capacitor in position.
    If you undo the two screw contacts and lift up the two mains wires without losing their orientation, you'll see the wires from the capacitor have just been bent round where the screw would go. Using a bit of tissue to keep the gunge from your fingers, lift the dead capacitor away and eventually discard it. Give the ceramic a wipe too, best to take away any residue.
    Then take your new capacitor and carefully bend its wires to fit round the screw holes in the same way as the previous one. My capacitor fitted neatly in the recess in the ceramic, as you can see in the picture. Be careful to ensure it doesn't foul the mechanism beneath it.
All done.
    Then reassembly is just the reverse of disassembly. Put the wires back in place, and do up the screws with the top half of the contact. Check everything looks as it does in the final picture, then ensure that each of the four rubber feet is in place on the corners and screw the cover back on. Give it a final check, then test the machine. You should have a working machine again, with no smoke.
    I've done this with all my machines, even those whose capacitor hadn't failed. Preventative maintenance makes sense, in this case.

Tuesday, 17 November 2015

Musings on online selling of electronic kits

    Earlier this year I started Language Spy while fresh from years in a permie job, to bring the fruits of computational linguistics to the masses. The first product  - political trend analysis for UK and US politics - made its debut soon afterwards.
    Since then a lot of work has gone in to creating and refining the next product, a corpus engine. The hope is to distill this down to app size, bringing the joy of being told something you didn't know about your language to anyone with a phone or tablet. It's been a slow business, creating a map of all that links every word in many gigabytes of text was always going to take a while.
    Alongside all that I found myself returning to my past, my training as an electronic engineer. I reclaimed my amateur radio licence and rediscovered the joy of making electronics. One thing led to another and a little add-on board for the Raspberry Pi became the focus of a Kickstarter campaign. OK, the Kickstarter didn't succeed, but it did well enough to demonstrate a market for radio kits on the Pi. And because any small startup needs revenue streams the next step was to investigate selling that board and others on my own account.
    As a web developer I bear the scars of many online retail experiences. In short: setting up your own web shop is a huge amount of work, worry, and risk. Been there, done that, and I wasn't going to do it again. I decided to go for a hosted solution, a software-as-a-service shop. I picked Shopify, which for about twenty quid a month gives you about as good a shop as you could hope for. The only thing it didn't do out of the box was print to integrated label stationery, but since Shopify's order printer uses HTML/CSS templates it was the work of about half an hour to make it happen. You only really find out how good an online service is when it goes wrong, but so far I'm pretty chuffed with Shopify.
    So the Language Spy shop was born, with the Pi RF breakout board, a direct conversion receiver, and a breakout board for using an Ethernet transformer for small-signal RF work. It's early days yet, but orders have come in and customers have their products.
    Of course, there are other ways to sell electronic kits online. And it does no harm to have more than one sales channel. So perhaps it was time to take a look at Tindie. This is an online marketplace for makers, something similar to the service Etsy provides for artists. It's a good idea that seems to have attracted a lot of attention and quite a few kits are available through it.
    Logging into Tindie and going through the product set-up process was straightforward. They take 5% of the total price including shipping, which could be better but then again you pay no other fees. I set up the RF breakout board as a product and added shipping zones, but then I found myself wondering whether it was such a good idea.

EDIT, April 2016. When I wrote this piece I raised a concern about Tindie hanging onto your cash for 30 days. Since then I've learned this only applies when you are a very new customer, to ensure you're legit. So there's a whole section removed from my original.

    PayPal payments are a minor annoyance. The problem with PayPal is that they're not a bank but an escrow service. A third party who says "Sure, I'll take that money from him and give it to you", without the cast-iron guarantees of banking law holding them to it. PayPal horror stories for small businesses abound, and while I'll use it to buy stuff personally I thus have an aversion to using it for my business. If they could make direct payments I'd be a lot more interested.
    The US-centric nature of Tindie is more of a concern. Dollars only and no VAT handling. I need something more friendly to a British accountant and a British taxman.
     I really hope Tindie make a success of their venture and I really hope they improve both their payment situation and their handling of international trade. But for now the breakout board on Tindie is in draft mode and I think I'll hold off making it live for a while.

Monday, 10 August 2015

Anatomy of a failed Kickstarter campaign

tl;dr: I put a simple electronic kit for the Raspberry Pi on Kickstarter, it didn't succeed. P&P made it look expensive, and I set my target too high. I'm wiser for the experience.

    Earlier this year I was using a general purpose prototyping board for the Raspberry Pi as little more than the receptacle for a BNC socket and passive filter to use the Pi's onboard clock generator as an RF source. It wasn't very pretty, with bits of copper wire soldered tot he earth lugs of the BNC socket, and most of the board was unused.
    So I had an idea: why not make a dedicated RF breakout board for the Pi, with just enough breadboarding space for a filter, and a BNC socket on board. No rocket science involved, but a handy little niche product. I'd put it on Kickstarter, and have a success on my hands.
    A Dirty PCBs order and a 3 week wait for China Post, and I had my boards fresh from China. Their "Protopack" order promises "10+-", in other words a bit more than ten if the process goes well and a bit less if it goes badly. My $10 got me 12 very nicely made boards, which for a prototype service is nothing short of astounding. Buoyed by this and a bag of connectors, I set to work on a set of prototypes and was soon using one of my Pi boards as a WSPR beacon.
    All was good. Suppliers sorted, good social media reaction, let's put it on Kickstarter as a kit.
    I'm no stranger to product fulfilment. I thus wasn't surprised to read lots of Kickstarter advice about pricing everything to the last fraction of a penny. Horror stories of KS projects who'd not accounted for postage and packing abounded, and I wasn't going to be one of them. So I did my homework, and created an exhaustive spreadsheet of all I'd need, down to the last piece of stationery.
    In a quick list, I considered the following:

  • The kit components
  • A click-to-seal plastic bag for the kit
  • Two pages of printed A4 instructions
  • A sticky label for the kit
  • A Language Spy sticker
  • Two different packaging options: small cardboard box versus bag
  • Padded envelope
  • Dispatch note/invoice/address sticker stationery
  • Different postage options: letter versus parcel, and prices for the different Royal Mail international regions
  • Kickstarter's cut
  • Between 5 and 10% failed delivery, lost in the post etc.
    I priced each of the above in three columns: for 100 kits, 500, and then 1000 kits, and added the VAT as I'm not VAT registered. I made my decisions on packaging and postage: bag not box, and letter not parcel postage. I then put together a sample envelope with all the things I'd be sending and took it to my local post office to check weight and postage rate.
    My gut feeling price for the components was about £2.50. As it turned out, that wasn't too far wrong for the 100 quantity, and it dropped below £2 for the higher quantities. The BNC connector was the most expensive component.
     The sundries added up to more than I expected. When you are used to printing single sheets without a second thought it's a shock when you tot up the cost of a thousand two-page double sided instruction leaflets.
     The biggest cost of them all was postage. Down the street: just under a pound, to Europe, somewhere under £2, USA just over £3, Australia well over £3. I took a decision at this point to charge one flat reward rate. I know Kickstarter have an option for different shipping rates, but previous experience with online shops has taught me that no matter how well you explain and calculate shipping you will always get some customers who manage to put their address in on the other side of the world and select UK shipping. I want to make kits, not argue with people thousands of miles away who can't read.
    So taking into account component prices, all the sundries, packing, postage, the Kickstarter cut, and a percentage for lost in transit, I came up with a £9 reward price. On Australian orders I would make not a lot, on US orders a bit more, and on UK orders a bit more than that. I expected most of my backers to be Americans, and this turned out to be the case. 
    Looking at comparable Pi dev boards, without a BNC they cost somewhere under £5. I would have expected a hypothetical retail version of this kit, probably in the cardboard box packaging and with a percentage for the retailer, to sell somewhere around £6. Let's call it $10, for Americans. Then an online retailer would add about £3.50 P&P. So I wasn't too far from the mark.
    If all of the above seems a little too much detail I make no apologies. It's very important to account for everything to turn a gut price for what you think the components might cost into what the finished item is going to cost. Get it wrong, and it'll hurt.
    So on to Kickstarter it went. I set the time for four weeks, and the target for 200 kits. This seemed not too optimistic a target, nor was it a huge amount of money. I put in a early bird offer with a pound off, and away it went.
    This was my first Kickstarter campaign. I took as my models the campaigns I had previously backed that I thought had done a good job, and set out to add value, to be responsive to backers, and to publicise without being irritating at it. My social media friends did a sterling job of helping me, I worked on a set of software enhancements for using the Pi as an RF generator, and I wrote a set of updates detailing all the cool things I'd done with the board.
    Along the way I had quite a few messages. Three groups: backers, non-backers, and spam from people offering miracle marketing cures to guarantee me a Kickstarter staff pick. The latter I ignored, the former I engaged with. No brickbats on the whole, one or two suggestions for enhancements, a few queries about the price to whom I explained the postage costs and the cost of the same on comparable boards.
    Progress started off well. For the first ten days if you'd drawn a ruler along the line I'd have been funded at the three week mark. I was expecting it to tail off into the second week as it dropped from visibility though, and it duly did. A few backers through weeks two and three, then a fresh spate of "rescue your failing project" spam from marketeers. In week four I got a healthy uptick in backers, but sadly it wasn't to be. It was somewhere just shy of 75% when the campaign expired, so no cheque for me to make kits for my backers and no metaphorical cigar.
    It's disappointing when something like this doesn't come off. But it's important to retain perspective. My future didn't depend on this project, its development cost me very little and it wouldn't have earned me a huge amount had it succeeded. So it's no biggie, and it was a very interesting process to go through.
    So... Where did it go wrong and what would I do differently next time?
    There are two areas which I think contributed to the failure of this campaign.
  • I set the sales quantity for success too high.
  • Postage and packing inflated the price the user saw.
    In the first area, there was no reason why I could not have set the bar at 100 kits, and if I had done the project would have succeeded. Pure optimism on my part. If I do another one I'll set the bar at the minimum level to give it that magic high percentage when it comes into visibility again at the end of the time period.
    In the second area, there wasn't a lot I could have done to change the reward price. And consumers who are used to making the purchase decision on the item page without seeing the P&P at the checkout were always going to see the reward as a bit steep. If I have earned one thing from this process it is that items costing under a tenner are disproportionately hit by postage costs, if I do another campaign it'll be for a more expensive item.
    So there we are. I put up a Kickstarter campaign, it got quite a few backers, but not enough. And I'm still standing. I think the RF board still has a future, though I'm not sure I'll relaunch it in the same place. Watch this space, it could be coming to a website near you.

Saturday, 18 July 2015

A practical antenna testing range

    If you have an interest in antennas it can be very illuminating to take real-world antenna measurements. This post describes a simple set-up to allow practical VHF and UHF antenna measurements on a budget.
    The first requirement is enough free space as to not cause interference or obstruction to your antenna. As much distance as possible in all directions, ideally many wavelengths. I used a field because I grew up on a farm, but you could use a public park, an empty beach, or common land.
    The second requirement is for some means of measuring RF field strength. There are specialist instruments to do this, but for cheapness and practicality in this case I used an RTL SDR, one of those USB digital TV sticks. I plugged it into my Android tablet, ran the SDRTouch app, turned off the automatic gain control, and turned the gain down to about 10% of its range. My receive antenna was the nasty little 15cm wire antenna that comes with the SDR, the only time I've ever used it in action.
    The third requirement is a transmitter. Any transmitter for the frequency of your antenna will allow you to take measurements, however for this practical test range you will need it to be capable of micropower output. I used a Raspberry Pi with my RF breakout board and an attenuator network. I calculated that my 47R-470R-47R Pi network resulted in an output around 0.03 mW, or 30μW. This resulted in a detectable RF field that was entirely within the boundaries of my range, in other words the transmitted signal was undetectable 100m from the antenna. For the purposes of legality I used a low-pass filter and a modified version of the freq_pi signal generator that inserted my callsign in CW into a continuous tone once every few minutes. 
    So, given my three prerequisites, I set to work. I set up my 2m HB9CV antenna in the middle of the field, chose an unoccupied frequency - a part of the repeater input segment not used in my part of the world - and fired up the Pi.
    The detection setup was a clipboard with a piece of paper, and the tablet and receive antenna secured with rubber bands. I walked away from the antenna at each point of the compass, noting down the received signal strength at each metre interval.
    My resulting figures could then be put into a spreadsheet and rendered as a radius plot to draw the radiation pattern for the antenna. And so I proved by measurement that an HB9CV is a directional antenna. Hardly unexpected, I'm sure you'll agree, but the real proof is that using a £20 single board computer and a £10 USB receiver it's possible to make real-world antenna performance measurements.

Tuesday, 30 June 2015

Measuring SWR with an extreme QRP transmitter

As I've used the prototype RF breakout boards for the Raspberry Pi, I've found one or two unexpected challenges posed by such a low power transmitter. This post deals with one of them, the problem of measuring SWR with not enough power to operate my SWR bridge.

When your transmitter only supplies 10mW of RF power it is extremely important that all components handling that RF do so with maximum efficiency. When you have plenty of power to spare it does not matter if you lose a bit along the way, but when you have so little in the first place your every loss will be felt. You thus need to ensure that your connectors and feeder are as low-loss as possible, and that your antenna has as good an SWR as you can make it. If you have a higher power transmitter on the same band in your shack it will be easy to use that to set up your antenna, but if all you have is a Raspberry Pi you may have to take a different tack from that which you are used to.

This might seem like a blindingly obvious revelation, but a 10mW transmitter does not have enough power to operate a lot of commercial SWR meters. Devices sold for use with watts or more of RF power may not have a range with the sensitivity required to give a reading when supplied with small numbers of milliwatts. My trusty Howes resistive SWR bridge for example is nominally a QRP device, but QRP in that case seems to mean watts in the single digits and it starts to have problems as the power dips under 500mW. When presented with 10mW it gives no meter deflection at all, to all intents and purposes it has become a useless instrument.

My solution when I needed to measure the SWR of my 70MHz WSPR dipole was to go back to SWR basics and use a directional coupler on its own with my multimeter measuring the voltage on its reverse port. My directional coupler dates from my days experimenting with 435MHz ATV, and is a few inches of coupled stripline on a PCB in a diecast box with Schottky diodes feeding its ports. 70MHz is probably not its ideal frequency, but just as an example with the Raspberry Pi as an RF source I measured between about 10 and 100mV on the reverse port increasing with the SWR of the termination. For the record the 70MHz dipole measured 81mV compared with a 50 ohm terminator's 10mV, indicating a poor SWR that turned out to be from a detached co-ax braid connection.

Some more information on directional couplers:
W2AEW video on directional couplers
https://www.youtube.com/watch?v=byF1FLdbUiA
GM8OTI stripline directional coupler for UHF
http://www.marwynandjohn.org.uk/GM8OTI/projDirCoupler/projDirCoupler.html
VK1HW ferrite directional coupler for HF and VHF
https://sites.google.com/site/vkonehw/home/homebrew/Bidirectional-Coupler/building-a-bidirectional-coupler

Friday, 26 June 2015

Raspberry Pi RF breakout kit on Kickstarter

So, I've done it. Put the Raspberry Pi RF board on Kickstarter. The thing I said I didn't think would work out as it would put me into VAT. In the end I decided I'd have to sell  a huge number to reach the VAT threshold so it was worth the risk. Time will tell how good a decision that was.

What have I learned from putting it all together? Everything costs more than you think it will. When I assembled a kit with components, packaging, instructions, a sticky address label, an invoice, and a Language Spy sticker, it really came home how many items I'd have to price up in quantity. And you learn just how quickly those small items can blow your original estimate out of the water.

Putting the pitch together was the easy bit. Writing comes easily to me. The video is more of a slideshow than a video, I felt there was little point trying to shoot an artsy video for an electronic kit. Kickstarter strongly recommend a video so I did one, that's it.

So here I am, all bases (I hope) covered. Kickstarter's fee and a contingency for lost deliveries factored in, the pitch done, and lead times secured from all suppliers. When I Tweeted the board I got a huge response, let's hope that will translate to a funded project.

So please head on over to the Kickstarter campaign, and if you like it, back it!

The link: https://www.kickstarter.com/projects/2001938575/rf-breakout-kit-for-the-raspberry-pi

Tuesday, 9 June 2015

A Raspberry Pi gives me a lifetime DX record

    The other day I dug out and dusted off my amateur radio logbook. The last entry was in 1993, a 70cms FSTV test with 2m talkback with a friend a few miles away. I noted at the time that my power output on 70cms was 50mW, and that the test was a failure. The transmitter was homebrew and I still have it, though I think I may have scavenged the output transistor.
    It's weird, reactivating a callsign so long dormant. Long enough dormant in fact that what always felt like a rather new callsign is now something of an old-timer. A lot's happened since 1993 in amateur radio, there are some interesting new bands and modes, and I can now use all the HF bands if I want to. I bet that went down like a lead balloon with the sheds-and-allotments nets on 80m! :) But to be honest I'm no longer interested in sitting in a shack at a microphone. I was always in it to experiment with radio and though I spent a lot of happy hours on 2M FM back in the day I'm probably not returning.
    Of the new modes that have appeared since I buried my personal amateur radio time capsule, WSPR caught my eye. Extreme QRP and extreme narrow bandwidth, and best of all, possible using just the internal clock generator of a Raspberry Pi. So with a quickly assembled 70MHz low-pass filter and an equally hastily built dipole I put together a 4M WSPR beacon.

    It's a while since I had an operational transmitter of my own. This one's only producing about 100mW, but it's still important to ensure a minimum emission of unwanted radiation. When your transmitter is at heart a logic level square wave there is a lot of possibility for harmonics.
    I hope it's not a damning admission when I say I was never able to really ensure I wasn't transmitting harmonics back in the day. I had my wavemeter but it couldn't go up into the high harmonics so if I built anything I had to rely on overprovision of low pass filtering. I suspect I was not alone in this and I never had the DTI breathing down my neck so I am happy I got it right.
   Now I have something unavailable to me in the 1980s and '90s, an RTL-SDR. I can have a waterfall spectrum analyser view of any couple of MHz slice of spectrum between 25MHz and 2GHz, so I can take a look for harmonics. Of course it's not a calibrated device so it's difficult for me to check relative values even if I turn off the AGC, but I can still check for presence or absence of radiation.
    In the room next to the Raspberry Pi, there are the harmonic peaks. Much lower than the carrier, but still there. Half a mile away though, the carrier is just as strong but the harmonics are no longer present. The lower-level harmonics I detected in the same room are not reaching my antenna, the LPF is doing its job. Good, that's what I want to hear.
    So, turn on the Pi, run WsprryPi, and keep an eye on the WSPR map to see who spots it. 4M is neither an easy DX band nor a popular WSPR band, so it wan't exactly a surprise when none of the five or so stations active at the time in Western Europe spotted me. But a Raspberry Pi doesn't use much power, so just leave it running.
    After two days, a sporadic-E opening. And a single spot, from just north of Madrid, in Spain. Nearly 790 miles to this part of Oxfordshire, for 4M that counts as pretty extreme DX.
    So, EA4ETR. The first callsign in my logbook since 1993, the first non-G callsign, and far and away my furthest DX on a difficult band all in one go. And all with a £25 computer and a filter and antenna from junkbox parts. Not a fancy chequebook transceiver in sight.
    That for me is what amateur radio should be all about.

Monday, 25 May 2015

A transceiver for not a lot

    I've just built a transceiver for the 4M amateur band. QRP(low power) and AM, it's not going to be something I'll work DX with, or indeed given my rural location not something I'll work *anyone* with, but I've had a lot of fun making it.
    My starting point was a 2M QRP AM transceiver courtesy of G3XBM, the 'Fredbox'. The receiver is a FET super regenerative design with an RF amplifier to stop unwanted radiation, and the transmitter is a very simple series modulated PA giving <100mW. I used 2SJ310 FETs in the receiver instead of MPF102s, and 2N3904s throughout in the transmitter. Everything else came from my hoard of electronic bits. I can't claim any astounding electronic design innovations as I was following someone else's proven design with a few adaptions when it came to winding coils and a few minor tweaks to bias resistors to get the desired voltage.
    The only significant difference from the G3XBM design is the lack of a crystal. Instead I'm using a Raspberry Pi as my frequency generator, running Jan Panteltje's freq_pi software. This controls the Pi SoC's clock generator, and can produce anything from the low kHz to 250MHz. Quite happy working on 70.260MHz.
    So there we are. A home made transceiver costing not a lot, and for not a lot of construction time. Rather more satisfying than a twenty quid BaoFeng handheld, I think.

Wednesday, 22 April 2015

An inexpensive video RF modulator

    This is a description I wrote a few years ago of my RF modulator for displaying video on older TVs that don't have a composite video input. The Grundig telly mentioned and the cheap DVD player that prompted the build are both long gone, but the modulator is still a very useful piece of kit that gets used for a variety of video sources.

    My TV set is an ancient Grundig. It's a good telly for its age but nowadays any TV without a SCART or other AV socket on the back is getting rather difficult to connect to newer kit like my DVD player that didn't come with an RF output. No problem, I thought, I'll just plug the DVD into the SCART on the back of my VCR and feed the TV through that. At which point I came up against our friends the copyright owners. I don't think they like people plugging DVD players into VCRs! To stop people copying DVDs to tape, they incorporate an alternating peak white/peak black bar into the teletext lines on the video signal encoded on the DVD. These are the lines that normally sit out of sight above the screen on the TV, you'll only see them move past if your TV loses frame hold. The effect of this peak white/peak black cycling is to play havoc with the VCR's automatic level control, resulting in a signal from the VCR that flashes on and off and is unwatchable. As someone who is just using their VCR as an RF modulator I get caught in the crossfire.

    At this point I had several options. (1)Buy a new telly with a SCART socket, (2)Return my DVD player and buy one with an RF output, (3)Buy an RF modulator, or (4)build an RF modulator of my own. I chose (4) because I didn't have the cash for the other three and since it was Christmas I wouldn't have found a shop open to sell me one. I looked on the Web to see if anyone else had built one and couldn't find any information, so here to fill the gap are the details of my RF modulator.
I decided not to build my modulator from first principles. A simple design with a UHF cavity oscillator and simple sound and vision carrier and modulation circuits is not impossible to make using parts from a scrap TV set, but when so many set top devices already have a modulator built into them why bother? Instead I lifted the RF modulator from a scrap Salora satellite receiver I picked up at a radio rally.

    RF modulator modules usually conform to a fairly generic design. I have seen almost identical modules from different manufacturers in VCRs, set-top boxes and satellite receivers with a wide variety of brand names over the years. They are usually a shiny tinplate box a bit larger than a matchbox with PCB mounting pins protruding from the bottom and at least one co-axial RF socket on the side. Mine has 2 co-axial connectors, one for the antenna and one for the TV, a small switch to enable a test signal for tuning the TV and a 5 pin PCB header for signal and power. Since it came from a device for the British market it has a 6MHz FM sound carrier and outputs on UHF channel 36. The output channel is adjustable by means of a trimmer screw. If you live somewhere else in the world your local specs may be different, however the principle should be the same.

    Before I removed the module from the donor satellite receiver an element of signal tracing was necessary to work out which pin did what on the PCB header. I was fortunate that while the receiver I was using had a dead CPU its main functions were in working order so I was able to identify the power supply pins quickly by powering it up and using a multimeter. The video and audio pins were a little more difficult to trace, while it was pretty obvious which two pins were the signal pins a little tracing of PCB tracks to the video processor and the sound chips respectively was required to be certain which was which.

    There now follows a quick description of each pin on my modulator. If you do this, there is no guarantee that yours will be the same, however the generic nature of these modules means that they are usually similar. I have numbered the pins from left to right with the RF connectors on the top and to the left.

    Pin 1 Video. I don't know the spec of this input but it is very happy with the 1V peak to peak composite video from the phono socket on the back of the DVD player.
    Pin 2 Audio. This pin takes a line level audio input. My module is not a stereo device so this is mono only. As I run the audio through a hi-fi system this doesn't matter to me but I could simply connect both the left and right audio outputs from the DVD to this pin.
    Pin 3 +5V modulator power. This pin provides power to the modulator circuit.
    Pin 4 Ground. I connected this pin to the tinplate chassis of the module, which also formed the ground for my power supply circuit.
    Pin 5 +5V antenna passthrough power. I did not use this pin. In the satellite receiver it was powered by the standby power supply to provide an amplified passthrough from the antenna socket to the TV socket. Since I did not need this function I ignored it.

    The circuit diagram of my modulator is shown below.

    To power this modulator I built a simple 5 volt regulator using the ubiquitous 7805 IC. I simply soldered a TO220 heatsink to the module case and built the circuit around it. My choice of capacitor values was based on those I had to hand. I also included an LED to serve as a pilot light to indicate that the unit was turned on.

    The 7805 circuit was powered from a surplus 7.6v adapter originally designed for an Ericsson mobile phone. There are so many pieces of electronic equipment powered by small low voltage adapters these days that it should not be difficult to find a suitable surplus power supply. Any DC source between 6 and 9 volts should be suitable, though if you do not have a suitable candidate you can buy a universal power supply.

    The video and audio pins were simply connected to trailing phono sockets by short lengths of coaxial cable and the whole unit was mounted in a small plastic box with some hot glue.

    The performance of the completed modulator is the same as you would expect for the piece of equipment the module came from. Once the TV is conencted to the modulator output and tuned to the test signal the test switch can be turned off and signal applied to the phono sockets. An RF modulated signal is unlikely to deliver picture quality equivalent to a directly fed video signal but in this case the unit performed well and the quality when viewed on my TV was not noticeably different from that of off-air analogue broadcast signals.

    In conclusion, this unit provides a quick high quality RF modulator from a selection of junkbox parts.

Thursday, 16 April 2015

The sad state of the Raspberry Pi software ecosystem

    When looking at possible channels for a future Language Spy product last week, I took a look at the Raspberry Pi Store.  I've been a Pi enthusiast from the moment I heard about the project, indeed the Language Spy political corpus is driven by a pair of them.
    The Pi Store is an app store powered by IndieCity which is available both on the web and through an application included in the Raspbian Linux distribution that most people run on their Pi.
    I hadn't looked at the store since it was launched, so I was rather saddened to see it in something of a moribund state. Very little activity, an absence of the commercial software that was there when I'd last looked, not a channel that seemed to be going anywhere.
    Of course, you might ask why the Pi needs an app store. After all, Raspbian is a Linux distro, and thus has all the huge library of Linux software available for it, at least all that will compile and run on the Pi's limited hardware. And in a sense you'd be right, in that a few seconds with apt-get can satisfy almost your every software need.
    But the success of a machine like the Pi depends on more than just using an operating system with a much wider support. Platforms succeed when they create an ecosystem around them, and while the Pi has been very successful at creating a hardware ecosystem the failure of the Pi Store serves to highlight the sad state of its software ecosystem.
    In the last couple of decades working in software companies it has been my observation that the most successful new platforms are those with the lowest barriers to development. In the 1990s the PlayStation trounced the cartridge consoles by not requiring developers to stump up for a huge inventory of plastic bricks for example.
    In a way one strength of the Pi - its Linux OS - is also its weakness when it comes to the Pi Store. There are so many different paths to Linux development that the Pi Store lacks that crucial low barrier to entry offered by a simple choice. What the Pi Store needs is an "official" way to write code for it. A straightforward community-supported development path encapsulated in a single download from the store which contains everything needed to publish. In fact I'd go further, what it needs is two such routes, one for simple apps and one for more demanding apps, roughly analogous to a framework like Apache Cordova and Java respectively in the Android world. Maybe Cordova on Qt and Qt itself would fit the bill.
    Meanwhile it's no use saying "Rubbish, everyone can just use [insert your pet 1337 dev environment here]!" when the people who are slowly becoming advanced users and wanting to code on their Pis might not have the required technical expertise to master all its nuances straight away.
    In the way thus described the Pi Store could become a channel with a low barrier to entry. This is not to say that the "official" dev path need be the only one, more of a "You can code how you like for the store but here's a straightforward way to do it".
    I won't be developing that Language Spy product first for the Pi Store as it stands, it would not make sense when other channels will give me a much better airing. The Pi remains a platform with some potential for a developer like me, but until some serious attention is paid to its app store I don't see it gathering its own software ecosystem.
    I don't know about you, but as a Pi enthusiast I think that's a shame.

Wednesday, 1 April 2015

Automotive manifesto

    Cars are crap, these days.

    Something has to be wrong, for me to say that. I'm a lifelong motor enthusiast, petrolhead and engineer. Cars are on paper at least, better than they've ever been. Their engines last for hundreds of thousands of miles, they don't rust, and they all handle pretty well perfectly.

    So why do I say that cars are crap these days?

    A few weeks ago I sat in a new car from a global manufacturer. It's nothing special, most cars from the last decade are to a greater or lesser extent similar. It's got an extremely advanced engine that will return MPG figures impossible a generation ago, it has a galvanised body, and it'll reliably haul a family of four all day in supreme comfort at autobahn speeds.

    Yet I am fairly certain that it and nearly all of its model will be headed for the crusher within a decade. Why? Driving it is not the experience we'd expect from a car made a decade or more ago, instead it's a software experience. It has a digital dash whose instruments were as far as I could see mostly on a TFT screen. When you turn the headlights on a switch doesn't complete a circuit to the light, instead its computer sends a signal to the microcontroller in the light to turn on. Same with all the other controls, even the handbrake. Yes, the handbrake, that thing you rely on to stop the car rolling away down a hill, is no longer a cable but a computer

    I looked at that car and saw an engineering masterpiece. I'm an electronic engineer, my dad's a blacksmith and I've been around bits of cars all my life. I know how all this stuff works, in intricate detail.

    But I also looked at that car and saw something I wouldn't touch with a barge-pole. I know that within that car is something that won't live up to the manufacturer's hard-won reputation for reliability. It may be that digital dash, it may be the microcontroller in the headlight, the one in the brakes, the throttle, or even the network of data cables that carry all that info around the car's systems, but something is going to fail on that car that won't be fixable without telephone number money, and then the car will be junk.

    The problem is of course that the manufacturer couldn't care less. The person who owns the car when whatever piece of techno-crap sends it to the scrapheap won't be the person who drove it off the forecourt, because people who are prepared to take the hit of new car depreciation usually do so because they are so desperate to always drive a new car that the money doesn't matter. So the people who keep the manufacturer in business simply don't care about its built-in obsolescence, therefore the manufacturer doesn't care about it either. (I am a rare exception, I've owned my 2001 car from new)

    This makes no sense. It's an oft-quoted line, that more energy is used in the manufacture of a car than in its lifetime of driving. Therefore if we can make cars whose engines and bodywork last forever it is irresponsible to throw them away before they are worn out. No, your fancy hybrid is about as green as a coal fired power station if it only lasts a few years.

    I can not in good conscience participate in this scheme of car ownership. On an environmental level sure, but also as an engineer, I don't think I want to buy something that's designed to be so unnecessarily complex as to be unfixable, it's just wrong.

    So here's my automotive manifesto.

    I will buy a car that has in every instance only the technology that is needed to perform the task in hand, not more than is needed. If all that is needed to turn my headlight on is a switch and a copper wire than I do not need a CAN bus and two microprocessors to do it. I am quite happy to pay for the copper wire and carry the marginal extra weight it brings to the car.

    I will buy a car that has high technology where it is needed and where its use makes sense. For example a microprocessor is necessary to control my engine or my anti-lock brakes, but is not necessary to provide basic instrumentation.

    I will not buy a car that uses high technology to ensure early obsolescence or to lock-in to a dealer network. If your digital dash costs a four figure sum to replace, or if only your dealer can perform service tasks, then you will not see my money and neither will your dealer.

    If I can not buy a car that meets these simple requirements then I will not spend a lot of money for a car made in a European, American or Japanese factory. I will simply spend as little as possible on the cheapest pile of Pacific-rim crap-on-wheels I can find, and bin it when it dies. If I do that then I'll have wasted a lot less money than I would binning a fancy car with a dead digital dash.

    I'm just one person. My consumer choices don't figure on the radar of a car manufacturer. But I know the automotive frustrations of one can also be the frustrations of many, as for years I kept the Austin Rover faith as they kept churning out frankly awful cars. Where are those Austin Rover factories now? Mostly housing estates, retail, and industrial parks.

    I know I won't be alone in walking onto the forecourt of the first budget Chinese carmaker to arrive in my town. Who knows, perhaps it'll occupy the site of the factory where they made that brand new car I mentioned earlier.

Thursday, 12 March 2015

The day I was DoSed by Google


    I launched my startup this week. On a very modest scale, no debauched parties or penthouse offices on scads of VC money, just me and my laptop in my dad's living room, popping open a bottle of home made cider to mark the event.

    Language Spy is the tangible fruit of a seven or eight year side project, creating a searchable corpus of political language. It's driven by a pair of Raspberry Pis doing the numbercrunching and uploading data to Google Cloud Storage buckets from whence the site is served by Google App Engine.
    You can see events unfolding through the words used about them, for example the correlation between "Hillary Clinton" and "Email" in the last week of US politics. If like me you're a news junkie, it's compelling viewing.

    Unfortunately though if you click the link as I write this, you'll see a Google App Engine quota exceeded message. The site won't work, because I have reached the point at which I can't afford the traffic it's serving and it has exceeded my daily budget.

    This traffic spike would be no problem if it were generated by real site users as then I'd be able to monetise the traffic, but sadly it isn't. Instead it's generated by GoogleBot. That's right, being indexed by a search engine has taken my site down. The bot looks at the site, decides it's on some very fast infrastructure, and issues millions of requests per hour.

    When I examine my problem, it becomes clear that it has several aspects:

  1. It's a language analysis site, so it has a *lot* of pages for the spider to crawl.
  2. Being a language analysis site there are no pieces of language I can exclude using robots.txt, so I can't reduce the load by conventional means. How do you decide which language is more important than other pieces? You can't, at least not when your aim is to have it all open for analysis.
  3. I can't tell Google to slow down a little, as where I'd expect to be able to do this in Webmaster Tools I get a "Your site has been assigned special crawl rate settings. You will not be able to change the crawl rate." message. I see this as the sticking point, if I could restrict Googlebot's rate I'd be able to keep the site running and take the hit of not being so well indexed.
    This means that the spider is eating through my daily Google App Engine quota very quickly indeed. I will find myself gaining a hundred instance hours in a very short time indeed as GAE spins up loads of new instances to deal with the spider. Pretty soon the site hits its daily quota and goes down. I could keep it going by feeding in more money, but I'd have to put hundreds of dollars a day into it and with no end in sight I am not made of money.
    Right now my only hope lies with a crawl issue report I filed with the Webmaster Tools team, if they can give me control over my indexing rate I'll be good to go.  But I can't say when they'll come back to me if ever, so I may just have to come up with a Plan B.
    Is there a moral to this story? Perhaps it's a cautionary tale for a small startup tempted to use cloud hosting. Google Cloud Storage has proved very cost-effective for a huge language database, but the sting in the tail has turned out to be how GoogleBot behaves when it sees a cloud server and how per-instance billing on App Engine handles unexpected traffic surges. The fact that it's Google who are causing me to use up my budget with Google is annoying but not sinister, however neither giving me the option to limit my GAE instance count nor slow down the crawl rate doesn't leave me as the happiest of customers.

    So yes, I've launched a startup. It's live for an hour or two a day while it has budget, in the morning UK time. Perhaps that will be my epitaph.

Sunday, 8 February 2015

When open source software goes astray

     I have just spent about half a day installing and configuring the latest version of Apache Cordova. I've used Cordova for several years now, it remains a great way to write a cross-platform mobile app.
     The reason for this article though lies in the first line. I spent half a day simply installing and configuring a mobile framework, I haven't opened an IDE yet, less still written a line of code. Let's consider that for a minute, this is a mobile framework, not an OS distribution! I am guessing I would have spent less time reinstalling Debian than I did yesterday to end up with a few megabytes of mobile project.
     Because that's all Cordova is, when you get down to it. A set of ready-to-go mobile projects for each platform that you pull into your IDE and start pushing HTML and Javascript into. And until version 3 that was how it was distributed. Unpack the downloaded archive, pick up the directory for your platform, pull it into the IDE, start coding. Have your prototype app in front of the boss at the end of the day.
     Cordova 3 changed all that, and going by my experience yesterday Cordova 4 hasn't fixed it. You install Node, use npm to get Cordova, run a command line to create your project, then another command line to add your chosen platforms and plugins to the project. The project directory has one master www directory in which you put your app code, and a simple command line builds each platform-specific project from that www directory. Putting aside the version and configuration hell that marred yesterday afternoon's install for me it sounds really elegant.
    Unfortunately though that is not the way apps are written in the real world. It would be great to write one copy of your HTML5 app and then deploy it to each platform and compile it from the command line on the same computer, but sadly cross platform app development doesn't work that way.
    Picture for a minute the office of a typical Cordova developer who produces apps across more than one platform. They may have a Linux box for Android development, running Android Studio or maybe Eclipse. Their Windows Phone apps will be developed on a Windows box with Visual Studio. And finally they will have a Mac running Xcode on which they develop their iOS apps. This is not a choice but a necessity, try asking Tim Cook or Satya Nadella for permission to develop for their mobile platform on the other's OS and you won't get very far. It's possible that the Android apps could be developed on the Mac or the Windows box, but it's still largely true that if you want to do cross platform app development for multiple target platforms you are going to have to have multiple development platforms and more than one IDE. It's not ideal and none of us really want it or like it, but it's the harsh reality of developing software for closed-source commercial platforms.
    In that environment Cordova's elegant project build structure is almost completely useless. Putting aside the unfortunate fact that each platform demands subtly different code for its in-app browser, it is impossible to load the generated Cordova projects directly into Android Studio, Xcode, or Visual Studio and develop them from their Cordova build directories because each time the project is rebuilt at the Cordova end the project you see in your IDE is overwritten. So you end up using Cordova's build system to create vanilla projects for Android, iOS and Windows Phone that you copy somewhere else and load into the IDEs before never touching the Cordova build system again. Instead of being an elegant and useful addition to the project it has become an annoyance and a significant inconvenience.
    So there's my Cordova rant. It's a bit unfair, Cordova remains a really useful piece of software. In reality I think it would be better to characterise my rant as one against the tendency in open source software to incorporate features not because they make sense for the software itself, but because someone thinks they are a good idea. In the same way that the developers of PHP who are not PHP coders but C and C++ coders seem to be on a mission to turn a sequential scripting language into a clone of C++, it makes sense to them but is increasingly divergent from the use case for the vast majority of PHP developers.
    Every open source project risks this pitfall as a side-effect of success. People write software because they want to solve a problem in their lives, but eventually they transition from being the people with a need for the software to being the people who only write it. They lose touch with why and how the end users use the software and imagine that they and not their users know best how it should be used.
    There is an obvious difference between the open source movement and the closed source commercial world. But one thing remains constant in both worlds: the customers will dump your product if you ignore their needs and try to dictate to them what they will have. IBM learned this the hard way in the 1980s with the PS/2; the customers and the rest of the industry continued evolving the PCs they already had rather than taking the direction IBM wished to impose on them.
    I find it sad that the same tale is played out in the open source world. Open source software could be a rich dialogue between users and developers, instead each successful project eventually loses its way just as commercial entities do. I suppose moribund companies spawn upstart competitors just as moribund open source software spawns vigorous forks, but there are times when the wait for a fork seems awfully long.

Friday, 14 November 2014

Someone who can't see 3D images uses an Oculus Rift for the first time.

   Last night, at Oxford Hackspace, I had my first try at an Oculus Rift VR headset. It was running one of the Rift demos, an office desk with a lamp and a playing card castle on it. Nothing unusual there, you might say. I'm guessing first Oculus experiences aren't much to write home about these days.
    I am maybe not in Oculus's sights though as a customer, because as I've written here before I was born with a strabismus. I have perfect vision in both eyes, but my left eye looks somewhere around twenty degrees to the left and I can switch my main vision from eye to eye. This means I can see over my left shoulder, keep an eye on the mirror without taking an eye off the road while driving a right hand drive car, and move my left eye independently of my right as a party trick.
    It also means I can't see in 3D in the same way as someone born with both eyes on the same heading. In the few months following my birth when my brain was configuring itself for the world around it, I never acquired the capacity for seeing objects as three-dimensional by combining images from left and right eyes because my eyes didn't deliver images close enough to each other. This doesn't mean I live in a flat two-dimensional world, it simply means I don't process 3D information in the same way as other people. To use an analogy of a modern computer system, I do my 3D processing in software rather than hardware. My brain developed to interpolate 3-dimensional space from a single 2-dimensional image and sometimes by the effect of my movement rather than by comparing two such images from different angles. I live in a 3D world, but sometimes - as for instance when trying to be a batsman in a school cricket team - things happen a little too fast for my 3D processing to follow.
    All of this means that 3D effects designed for people without a strabismus - stereograms, autostereograms, and 3D movies - don't work for me. I will never be able to see an autostereogram, and a 3D movie is for me a 2D movie in which I disregard what's being sent to my left eye. Fine by me, I'm happier to pay less for a 2D showing anyway.
    So I didn't expect much from the Oculus. And yes, once looking into it the feeling was of having a couple of normal 2D screens in front of me. Not too different from my day-to-day workstation, except with full-field vision rather than a pair of LCD monitors.
    The sight of assorted geeks queuing up to flail blindly about a crowded hackspace wearing a headset is mildly amusing. In my case trying to keep my movements to a minimum I started to look around. Looking down, the desk and the lamp were just a 2D picture of a desk surface and a lamp. Switch from eye to eye, nothing changes.
    It was a mild surprise when I moved my head to the left and the card castle came into view. It was a picture of a card castle on a monitor, then suddenly it was a 3D card castle. Swing back to the lamp, and it's a picture of a lamp. Back to the card castle, and it's a 3D object. I was only using my right eye, but I could see inside it as I knelt down.
   So I had one 3D object in otherwise 2D space. Not really Better Than Life, but far more than I expected. What's happening here? In the real world, I interpolate 3D even when I'm not moving because I know something about the environment. I know a teapot in front of me is a 3D object because I have a huge amount of real-world lighting and other visual information. I can reach out and touch it. That knowledge means that when I reach out to take hold of it I know not only roughly where it is, but what size it is so I can grasp its handle with a good expectation of the dimensions my hand will have to close over. If I move around an object the amount of information I have about it increases, and so does my ability to see it in 3D.
    I think that there is an information threshold for me to see something in 3D. A 2D image on a screen or a page does not have enough information from its lighting or how its aspect changes for me to see it as containing 3D objects. I think the lamp and the desk did not pass this information threshold while the card castle did. It had enough complexity for it to provide my brain with the information it needed to cross the threshold as my motion caused the Oculus image to change.
    This opens up the interesting prospect of people with a lifelong strabismus having an ability not shared with most others: that of seeing a 3D image from a single 2D source when that source is coupled with motion sensing. It would be extremely interesting to see if a 3D-rendered-as-2D FPS game could become 3D-immersive for me if it were displayed on an Oculus with its motion sensor controlling in-game movement.
    I am guessing I only have this ability because my strabismus is life-long. I gained it because my brain developed with it, I am therefore guessing someone who grew up with stereoscopic vision but later lost an eye or gained a strabismus through injury would not see a 2D image as 3D in an Oculus headset. I'd be interested to hear whether or not that was the case.
    Some people have a big problem with strabismuses. Parents subject their children to surgery without their consent to have them "corrected". Says more about their insecurities and the desire for "perfect" offspring than it does about the effect of a strabismus. Mine has mostly never been an issue, sometimes it's unnerved people and I'll never play cricket or baseball. I would never subject a child of mine to unnecessary cosmetic procedures, to me a strabismus is just part of who you are. Yesterday's experience added a new angle on my strabismus and for that I'm happy. I can add seeing 2D images in 3D to seeing over my shoulder in the meagre list of super-powers it's given me.


Thursday, 3 July 2014

Bow for nowt


    Last weekend, I made a bow. Not because I've had a hankering for one, but because I spotted the perfect material and had to give it a go.

    My friend Rebecca was replacing her bed. The old one had a lot of very springy plywood slats, far too good to let go to the tip. So I detached them, bound them up with tape, and brought them back home on the back of my bike.

They're too wide to make a bow on their own, the ends of a bow need to be considerably less stiff than the centre where you hold it. And they weren't long enough to make a bow on their own, I'd have to bolt two of them together.

    So I cut two of them on a taper, leaving a section of a few inches intact where they'd be bolted together. I then drilled three holes for the bolts, and applied a layer of No More Nails glue to the joining surfaces before doing up the bolts. This left me with a long and springy bow, but no means to attach a bowstring to it. Out with the saw again to cut a couple of notches at each end. My bowstring - a knotted piece of the orange baler twine that is ubiquitous on farms - simply hooked over the end of the bow into the notches.
Is it a good bow? Not being an archer I have no idea. But It takes the length of my draw without damage, and it feels as though I'm putting quite an effort into it. And it shoots bamboo canes down the lawn rather well. Next up, a pack of cheap arrows from Amazon, I'm not hard-core enough to do my own fletching.

Wednesday, 12 March 2014

Small computer, big data

    This post comes as one of the longest running scripts I've ever created has just finished its work. In the last week of January I set my Raspberry Pi to the task of processing 5 years of news stories into a 20Gb tree of JSON files, and here in the second week of March it's completed the task.
    Given that a PC has done the same job in a couple of days the first question anyone would ask is simply this: Why?
    My Pi runs all day every day, 24/7. It collects the news stories from RSS feeds and stores them in a MySQL database. It uses somewhere under 2 watts, and it will do this no matter what I ask it to do because it's plugged in all the time. I can touch its processor with my finger, it's not hot enough to hurt me. My laptop by comparison with its multi-core Intel processor, board full of support chips, and SATA hard disk, uses somewhere under a hundred watts. I can feel the hot air as its fan struggles to shift the heat from the heatsink. I wouldn't like to hold my finger on its processor, assuming I could get past its heat pipe.
    Thus since I'm in no hurry for the data processing it will use a lot less power and it makes more sense for me to run the script on the Pi. This isn't an exercise in using a Pi for the sake of it, instead the Pi was the most appropriate machine for the task.
    So having run a mammoth script on a tiny computer for a couple of months, how did I do it and what did I learn?
    The first thing I'd like to say is that I'm newly impressed with the robustness of Linux. I've run Linux web servers since the 1990s but I've never hammered any of my Linux boxes in quite this way. Despite stealing most of the Pi's memory and processor power with my script it kept on with its everyday tasks, fetching news stories and storing them as always. I could use its web server - a little slowly it's true -, I could use its Samba share and I could keep an eye on its MySQL server. Being impressed with this might seem odd, but I'm more used to hammering a Windows laptop in this way. I know from experience the Windows box has not been so forgiving running earlier iterations of the same script.
    If anybody else fancies hammering their Pi with a couple of months of big data, here's how I did it. The script itself was written in PHP and called from a shell within an instance of screen. This way I could connect and disconnect at will via ssh without stopping the script running. The data came from the MySQL server and was processed to a 64Gb USB Flash disk. The Flash is formatted as ext4 without journaling, this was judged to be the best combination of speed and size efficiency. An early test with a different FAT formatted drive provided a vivid demonstration of filesystem efficiency as the FAT ended up using 80% of the space after only a short period of processing.
    The bottleneck turned out to be the Flash drive, a Lexar JumpDrive. Reading and writing seems to happen in bursts, the script would run quickly for about 30s and then very slowly for the next 30s purely due to disk i/o. In future I might try the same task with USB-to-SATA hard disk, though I'd lose my power advantage.
    So would I do the same again, and how might I change my approach? I think the Pi was a success in terms of reliable unattended operation and in terms of low power usage on a machine I'd have had running anyway. But in terms of data processing efficiency it could have been a lot better. A faster disk and a faster computer - perhaps something with the Pi's power advantage but a bit more processor grunt such as the CubieBoard - would have delivered the goods more quickly for not a huge extra investment. And the operating system though reliable could probably have been improved. I used a stock Raspbian, albeit with the memory allocation for graphics reduced as low as it would go. Perhaps if I'd built an Arch image with a minimum of dross I would have seen a performance increase.
    I used a Raspberry Pi for this job because it was convenient to do so, it uses very little power and I had one that would have been powered up anyway throughout the period the script was running. The Raspberry Pi performed as well as I expected, but I can not conclude anything other than that it is not the ideal computer for this particular job. It is sometimes tempting when you are an enthusiast for a particular platform to see it as ideal for all applications, well in this case that would be folly.
    The Pi will continue to crunch the data it collects, though on a day-to-day basis as part of the collection process. In that it'll be much more suited to the task, as a cron job running in the middle of the night the extra work of a day's keyword crunching won't be noticed. And there's the value in this exercise, something that used to require a PC, a while of my time and a little bit of code has been turned into an automated process running on a £25 computer using negligible power. I think I call that a result, don't you?

Friday, 24 January 2014

Can you run a small business with the Raspberry Pi?

    There are three Raspberry Pi computers scattered around our flat. A 512k Model B is an application server running my keyword analysis system 24/7, my original 256Mb Model B serves as a Raspbmc set-top-box, and a 256Mb Model A serves as a general purpose hardware and software hacking platform with an attached camera.
    I am a demanding user of the first of those three, the keyword analysis system involves gigabytes of data and processor-hungry scripts. It's not the fastest machine on the block by any means, but after 18 months or so of continuous Raspberry Pi use for this application I am very impressed with how little intervention it has required. After most of a career developing similar coding and database tasks using office Windows server machines I find myself appreciating the Pi for another reason than its low cost and low power: its reliability in both software and hardware terms.
    If you run any kind of business you do not view your computing needs as a home user might, in terms of hardware cost. Instead you price IT as an ongoing investment over the lifetime of the kit, in which the cost of support, licencing and upkeep may significantly outweigh the purchase price of a computer. Looking at my experience with the Pi as an application server I can't help wondering whether its reliability and stability might make it a surprisingly good fit in a business environment, for at least a small business if not in some cases a larger one.
    So what does a small business need from its IT systems? Every business is different of course, but if you were equipping a generic office network for the first time you might reasonably expect to have the following components:
  • Desktop computers
  • A file server
  • Some means of sharing a printer
  • An email server
  • A firewall and internet connection
  • Network infrastructure - let's go with wired Ethernet here and not start talking about Pi-based wireless hotspots
   As a thought exercise it is worth considering how each component might be addressed using a Raspberry Pi, and what if any benefit that choice might bring.
    Desktop computers: One of the first things most people will do with their Raspberry Pi is write a copy of Raspbian to an SD card and type "startx" at the command prompt once they've booted it and logged in. So it's beyond doubt that given a keyboard, mouse, and monitor the Pi is a desktop computer. But how would it perform in a business environment?
    Software's no problem. Raspbian benefits from a huge library of Linux packages. There's no need to fork out to Microsoft for an Office licence when you can run LibreOffice, for example. But I know if I was using my Pi for office work I'd find myself wishing it was a lot faster. I seem to remember an early description of a Pi as being like a Pentium II with a very fast graphics card, but without the ability to make use of its GPU capabilities the Pi's slow speed Achilles heel is only to obvious. Like many Pi users I look forward to receiving stable OS builds featuring the Wayland support we were shown a preview of last year.
    Benefits of a Raspberry Pi business desktop? Low initial cost, low maintenance cost - simply replace defective hardware with a new one for £25 - no software licence fees, low power consumption.
    Disadvantages of a Raspberry Pi business desktop? It may be the fastest desktop you can buy for £25, but undeniably it's not the fastest desktop you'll ever use
    A file server: This is something the Raspberry Pi can do very well. A headless Linux box has no worries about graphics speed so is only held back as a file server by the speed of its network card and disk drive. Plug an external USB drive into a Pi and it's true you don't have an enterprise-class server, but it will still offer perfectly adequate performance for a small office network. This guide to setting up a SAMBA file server uses Arch Linux, but as my keyword tool server proves every time I pick up data from its share with my Windows laptop the same setup works just as well with Raspbian.
    Benefits of a Raspberry Pi file server? Extremely low cost, reliable hardware, low power consumption
    Disadvantages of a Raspberry Pi file server? Some command line admin is required to set it up, especially if your needs extend beyond simple open-to-all file shares.
    Printer sharing: Nowadays you don't have to pay much money for a printer that can already connect to a network, and it probably makes the most sense to do that if you can. After all in a business network the simplest method of getting what you need is more important than the most technically interesting. But this is a piece about using the Raspberry Pi, and a Pi can make a very good network printer sharing device. So here's a tutorial about setting up CUPS on a Pi and sharing it on a network.
    Benefits of a Raspberry Pi print server? Flexibility to print to whatever device - or even software - that you want to set up.
    Disadvantages of a Raspberry Pi print server? Requires command line admin to set up, more complex than using a network printer in the first place.
    Email: Again from a business perspective does it make sense to use a Raspberry Pi as an email server when you can buy any one of a multitude of cloud hosted email products for your organisation? If it were me I would outsource my email every time and gladly pay for it, but for those who really need their email in house here's a tutorial describing a Raspberry Pi email server.
    Benefits of a Raspberry Pi mail server? Reliability, low power consumption, and complete control of your own email.
    Disadvantages of a Raspberry Pi mail server? Significant admin skills required to set up and run.
    Firewall: Here a Pi can undeniably do an extremely good job. Installing OpenWRT on a Raspberry Pi turns it into a very effective firewall. But yet again this is a feature offered at an almost commodity level by almost all domestic and small business routers. As with printer sharing, in business it pays to go for the easiest way to get what you need.
    Benefits of a Raspberry Pi firewall? Huge flexibility that may not be offered by an off-the-shelf router. Any protocol you want to run through it can be set up.
    Disadvantages of a Raspberry Pi firewall? Significantly more complex than an off-the-shelf router firewall, requires admin skills to set up.
    So there's a small business network with Raspberry Pi desktop machines and a Raspberry Pi file server, and all for Raspberry Pi prices. Network printing is probably better built into the printer, the firewall is probably best left to a commercial router, and email is a lot less hassle in the cloud. All that's missing from most business requirements is a business-level portable Raspberry Pi, maybe somebody's working on a professional laptop enclosure as I write this.
    The question is, would I have run my business on a network like this? Would I drop my nice modern laptop with dual boot Windows and Ubuntu to develop on a machine with a lot less speed? Probably not. But if my line of work didn't rely on raw computing power and needed instead some reliable document processing would I consider this as an alternative to a heap of Dells at several hundred quid each, a hefty Windows Server licence bill, and an ongoing relationship with an IT support company?
    I think I'd be silly not to give it a second look, don't you?

Wednesday, 13 November 2013

Developing the Oxford Dictionaries Quick Search app

    Well here we are after what seems like an age of tweaking, the Oxford Dictionaries Quick Search app is finally available for installation. It can be found on the iTunes website here, and on Google Play here. The Windows Phone 8 version should with luck be out in a few days.
    As the developer of course I'm going to say it's a brilliant app, but that would verge on shameless astroturfing. What I can say is that it's a simple and lightweight free English dictionary look-up app that I hope users will find useful.
    Under the hood, it's a client for the Oxford Dictionaries API. This of course means that it requires a data connection to run, but does give the advantage of the app taking very little space and providing the most comprehensive and up-to-date dictionary entries. Though it's hardly a novel use for the API it does demonstrate the functionality and speed of the service, as well as the ease with which the API can be developed against.
    The app uses the PhoneGap cross-platform HTML5 app framework with jQuery and jQuery Mobile providing the Javascript heavy lifting and user interface respectively. These packages have allowed us to deploy the app on three platforms in quick succession with minimal investment, something we could not have done had we been required to write all three versions natively. The quirks of the different HTML5 implementations have caused us a few headaches along the way, but not significantly more than web developers are used to when dealing with different browsers.
    It's been interesting to compare side-by-side the ease of development on the different mobile platforms. Android is the easiest as you'd expect, but with a Wild West of devices and OS versions out there it needs to be. We've been scouring our colleagues for odd Android versions and form factors to try our app on, yet I'm sure we've not tried them all. In particular we decided that with 25% or thereabouts of the Android market we couldn't abandon support for version 2.3, so we've had to contend with its incomplete font support and sometimes shaky HTML5 implementation.
    iOS by comparison with a set number of devices should be easy to develop for but starts to become more effort due to the stringent demands of Apple. Attaching different iOS devices to our development environment can at times be a challenge, and the ballooning demand for supporting resources such as splash screens, icons and screenshots for different resolutions and OS versions sometimes feels as though it is getting out of hand. However the App Store approval process was much quicker than we expected it to be.
    The Windows Phone 8 development environment shows Microsoft's typical attention to detail. The supporting resource requirements are well-thought-out, getting the app on a device is straightforward, and the free version of Visual Studio is a delight to use. However the fact it would only run on 64 bit Windows 8 seems rather strange, and Microsoft have not quite shed their reputation for quirky HTML environments. I didn't expect the problem we had with an animated GIF loading spinner, for instance.
    So it's been an interesting experience. I'd recommend PhoneGap to anyone wanting quick development of multi-platform mobile apps, though it's provided a few learning experiences of its own.

Tuesday, 5 November 2013

Fixed jQuery Mobile footers on Windows Phone 8

    Here's a solution to something which baffled me for a while: making a jQuery Mobile footer that stayed at the bottom of the screen and didn't scroll away with the content in a PhoneGap app on Windows Phone 8.
    jQuery Mobile is usually pretty good at making fixed footers. The code below works fine on Android, using data-role and data-position attributes on the footer div.

<body> 
<div id="container" data-role="page" data-theme="f">
    <div id="header"  data-role="header" data-position="fixed" data-tap-toggle="false">
    Header content here
    </div><!-- /header -->

    <div id="content" data-role="content">
    Page content here
    </div><!-- /content -->

    <div data-role="footer" data-position="fixed" id="footer" data-tap-toggle="false">
     Footer content here
    </div><!-- /footer -->
</div><!-- /page -->
</body>

    Unfortunately, on Windows Phone 8 it places the footer at the base of the screen but does not allow the content to scroll underneath it. Thus your footer scrolls up the screen with the content, hiding a bit of content as it goes and looking really horrible.
    You might think breaking out of jQuery Mobile by losing the data-role and data-position attributes and then applying a fixed position and a z-index to your footer would do the job. After all, it's the standard fix for some of jQuery Mobile's footer quirks on iOS. But sadly all that does on WP8 is anchor the footer to the bottom of the page rather than the bottom of the screen, resulting in a long scroll to see it. Less obviously broken, but still not what we want.
    My solution then was to apply a fixed height to the content div and allow the default WP8 overflow:auto; CSS to make its content scroll out of sight beneath it. I removed the data-role and data-position attributes from the footer and used a little piece of javascript to calculate the height of the content div from the heights of the surrounding divs and set it. Not necessarily the most elegant solution, but one that should reliably work across a range of devices.

<body> 
<div id="container" data-role="page" data-theme="f">
    <div id="header"  data-role="header" data-position="fixed" data-tap-toggle="false">
    Header content here
    </div><!-- /header -->

    <div id="content" data-role="content">
    Page content here
    </div><!-- /content -->

    <div data-role="footer">
     Footer content here
    </div><!-- /footer -->
</div><!-- /page -->
<script>

//NB the code below references jQuery, not included in this HTML for simplicity

var headerSpace = parseInt($('#header').css("height")) + parseInt($('#header').css("marginTop")) + parseInt($('#header').css("marginBottom")) + parseInt($('#header').css("paddingTop")) + parseInt($('#header').css("paddingBottom"));

var contentSpace = parseInt($('#content').css("marginTop")) + parseInt($('#content').css("marginBottom")) + parseInt($('#content').css("paddingTop")) + parseInt($('#content').css("paddingBottom"));

var footerSpace = parseInt($('#footer').css("height")) + parseInt($('#footer').css("marginTop")) + parseInt($('#footer').css("marginBottom")) +
parseInt($('#footer').css("paddingTop")) + parseInt($('#footer').css("paddingBottom");

var contentHeight = window.innerHeight-headerSpace-contentSpace-footerSpace;


$('#content').css("height", contentHeight + "px");

</script>
</body>

    I hope this helps put you on the right path. There seems to be frustratingly little documentation out there on what WP8 does and does not support, and on workarounds for what seem to be common problems. With luck this fix has plugged one such hole.